How to Make a Rocket Stove for Camping?
Table of Contents
What is a rocket stove?
Have you ever heard about using a rocket stove for outdoor camping? It is a very efficient wood-burning stove and you can quite easily cook your meal with less wood and sprinkles. You may not have heard of it but it is very famous among campers. In some second and third-world countries, people use an alternative version of the rocket stove to cook their meal. The main reason why rocket stoves are very popular is their efficiency in heat-producing and you can build them with almost nothing.
Today, we will talk about how you can build a rocket stove for camping. There are many ways to make a rocket stove and they are very easy. All you need is a handful of things that you can manage very easily.
What is the principle of rocket stoves?
The main principle of all rocket stoves is the same. You have two holes interconnected with each other. One is vertical and the other is horizontal(not necessarily, it can be angled differently). The woods are placed in the vertical hole. On top of the vertical hole, you will need to place two pieces of wood or something to keep your pot level up from the hole opening. Now lit up the woods from the horizontal hole. Fire needs air (Oxygen) to burn.
Air will enter the stove through the horizontal hole and spread the fire. The heat and smoke will come out through the vertical hole. If you block the opening of the vertical hole, it won’t work. That is why you need to place the pan/ pot a little higher with some support.
You can build a portable rocket stove at home for camping or you can build one in the camping spot. So now, without any further adieu let’s look at how to build a rocket stove in many ways.
1.Dakota fire hole
Let’s start with the one that is not a portable method for making a rocket stove for camping. You will have to build it into the camp side. Now there are different versions of it but the principle is the same. That is to dig two holes that connect inside. It is better to look for a small slope. It is easier to build it there. If you find a slope, dig one hole at the top and another near bottom horizontally. Now connect these two holes underground. If you could not find a slope, no problem. Dig two holes in plain grounds and connect them underground. One of them will have the fireplace and the other will drive air into that fire pit.
Pros:
- Reusable
- Can be made bigger or smaller
- The most reliable rocket stove
- Can serve as a fireplace to keep you warm
Cons:
- Not portable
- Has to be built on the camping site
- Takes a lot of labor to build
- Not self-sustaining (Always needs wood to burn)
2.Building a rocket stove for caming using a 2X2 wood
This is the cheapest way to build portable self-sustaining rocket stoves for camping. Because it is self-sustaining (burning itself to produce fire), it has a limited life span.
To beging we will need 8 feet long 2X2 wood. It may cost about $2. Now we will cut that wood into 16 pieces. Each piece will be 6 inches long. Now take a piece and drill one hole vertically in the dead center. Use a 1 or 1 and a half-inch drill bit. Then dig another one in the side horizontally. Now take two small pieces of wood and place them beside the vertical hole to create a gap between the pot and the hole, leaving a gap for the smoke to come out. After this, pick up some wood shavings that you got from drilling.
Place them inside the vertical whole. Make sure not to block the whole openings, it will stop the airflow. Finally light it up. As the stove is made out of wood, it will also start burning after a few moments and you don’t need any extra wood for cooking. Each of these 6 Inch rocket stoves will produce a great amount of heat for about 60 minutes, giving you enough time to cook up a meal for your camping family. With the price of $2, you will have 16 of these portable rocket stoves that are perfect for camping.
Pros:
- Portable
- Cheap and easy to make
- Self-sustaining
- Can be held on hand
- The horizontal hole can be directed towards the wind to let more air go in
Cons:
- Limited life span (60 minutes)
- A drill and saw is required to build
- Might leave a burn mark on places you put it
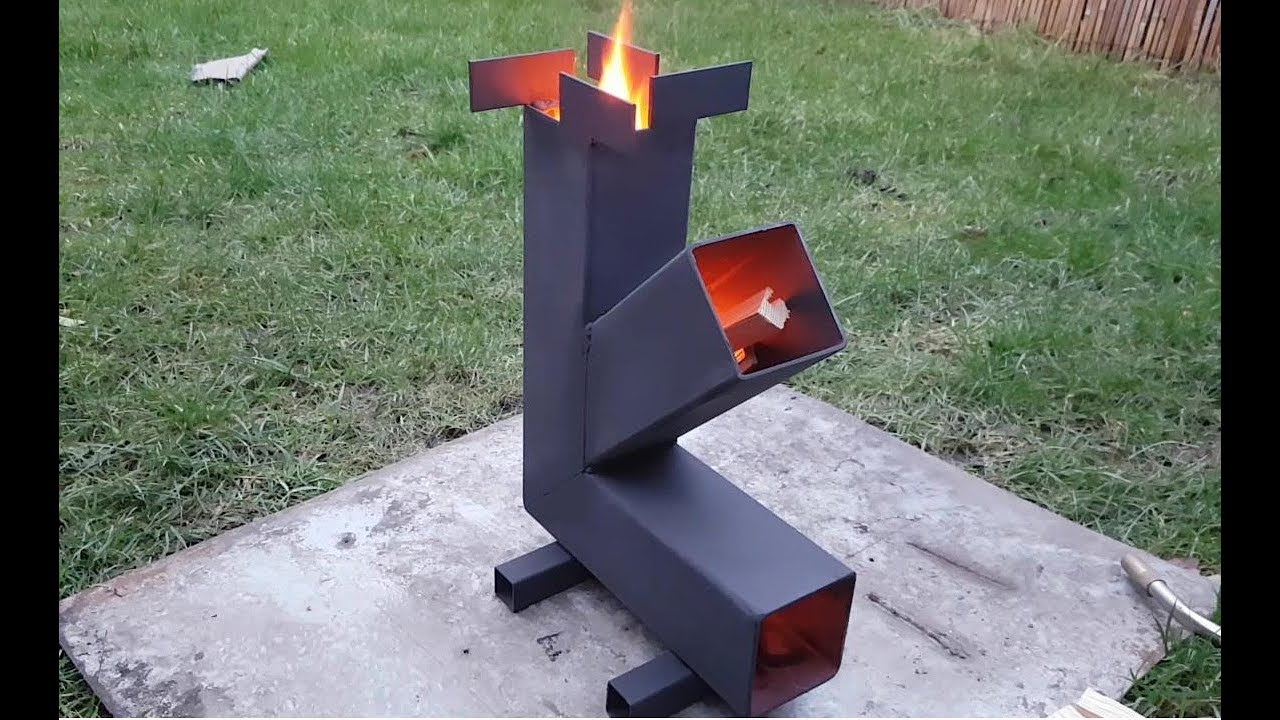
3. Building a permanent rocket stove for camping from HVAC T joints
Let’s find out how to make a permanent and portable rocket stove for camping. You will need an HVAC T joint, a metal adapter, that will fit perfectly with the joint, heat spray paint, and heat cement. Since it will be made of metal, it will be extremely hot to touch with your hand, so you can do some modifications and attach a handle in the way you want.
Now to build the rocket stove, attach the adapter on one side of the T joint. Drill holes on that adapter to make openings for the smoke to come out. Then block the opposite side. Pour some heat cement there to add on some weight to it so the stove won’t fall over.
The heat cement will also work as an insulator, so you can place the stove on any surface without the worry of burn marks. Use the middle joint hole as your horizontal hole. That will be used to light up the wood inside and create airflow. Now you can attach a handle in any design you want, we leave that on you. Heat the stove and after a few times of cooking, the galvanization of the metal sheet will come out. Use the heat spray paint then as it will help protect the stove from rust.
Pros:
- Not self-sustaining
- Portable
- Reusable
Cons:
- A little complicated design
- Needs time and effort to build
FAQs – Frequently Asked Questions
Is a rocket stove for camping better than a campfire to cook?
Yes, Because the rocket stove needs less wood to produce fire and heat. There is no waste in the system.
Is the horizontal hole necessary for a rocket stove?
Yes. The horizontal hole allows air to flow into the fire and makes it burn faster.
Conclusion
So there you have it, three different techniques to build a rocket stove for camping. Now grab your tools and get busy.

Meet Sarah, a passionate traveler and camping enthusiast who loves to explore the great outdoors. With years of exploring, she has become an expert in testing and reviewing the best tents on the market which got her to start mytravelingtents.com. Her insightful reviews provide valuable information to fellow adventurers looking for the perfect tent for their next camping trip.